Location: Delaware Freezer Company
Players: Phil Gardocki, Leichte Panzerkompanie (attacker)
Jessie, Leichte Panzerkompanie (defender)
Game: Flames of War 1500 points
This was a “Red on Red” German Kriegsspiel which Jessie and I decided was conducted to test out a new camouflage pattern. My panzers were painted in a tri-color of a grey base, with green and brown striping. My understanding is this is not a historic pattern, that the Wehrmacht painted their vehicles grey/brown till after the French campaign, then switched to grey/green afterwards. I decided to go with both so to not be totally incorrect for the time period of 1939 -1941.
This was my Leichte Panzerkompanie’s first outing, and my first FOW tournament.
The Lists:
Leichte Panzerkompanie (attacker) 4 platoons containing 3 Panzerbefehlswagens, a recovery vehicle, 4 Pz I’s, 11 Pz II’s (late), 4 Pz III’s, with Limited Air Support.
Leichte Panzerkompanie (defender) 6 platoons containing 3 Panzerbefehlswagens, 5 Pz I’s, 10 Pz II’s (Early), 3Pz III’s, 4 Sd Kfz 231’s with Priority Air Support Schwerpunkt.
The Board:
4 by 6 feet. A large town was almost dead center of the board, with a road running through it that bisected the large edge of the table, and effectively divided the board into two 4’ x 3’ sections. The outskirts of the town was dominated by large wheat fields, with a few rises in terrain, and two small woods features. The woods were both on the same side on the board, one astride the road in the center, the other near the short edge of the board. A small pond was about 12 inches from the left of the town. The wheat fields provided concealment for all vehicles except the Pz III’s and Sd Kfz 231’s.
Two objectives were placed on the defenders side of the board. Both about 10 inches in, one about 15 inches from the left side, the other about 18 inches from the right. All in all, the board was fairly symmetrical. The defender had advantage of vast wheat fields and a couple copses of trees, the attacker had fewer fields and more rises.

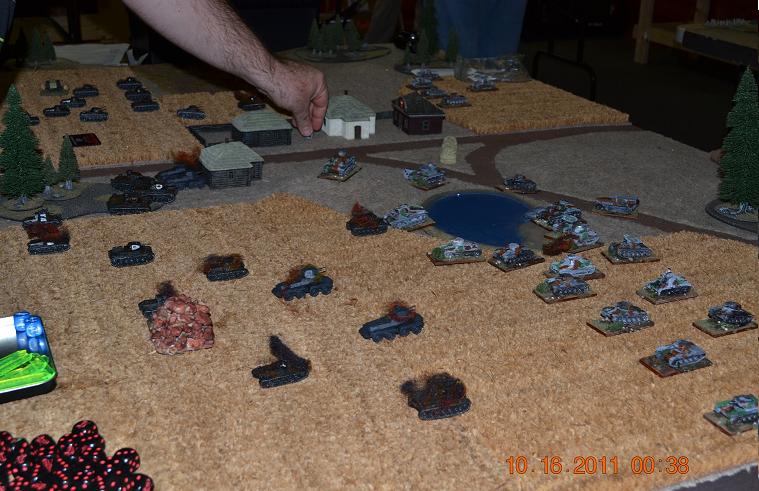
Attackers to the right. Picture snapped after attackers first move, before shooting.
Mission: Fighting Withdrawal
Game ends when the attacker holds an objective. Victory is determined by points at that time.
Deployment
German: The defenders tried to cover both objectives evenly. A Leichte platoon (1 Panzerbefehlswagen, 2 Pz I’s and 2 Pz II’s),and a Pz II platoon (5 Pz II’s) covered the right objective. Another Leichte Platoon covered the left, supported by 2 Sd Kfz 231’s and the command teams. 2 Sd Kfz 231’s held a centerline position, while the 3 Pz III’s were in ambush.
German: Knowing my opponent had a short platoon of Pz III’s in ambush, I tried to negate that advantage as much as possible. There was a copse of trees only about 8” from the right objective, but the nearest trees were about 16 inches from the left hand objective. I deployed 3 platoons on the left, and a single Leichte Platoon on the right.
Turn 1:
Learned something new, Air Support means Air Support, not necessarily bomber support. I rolled my Stukas to come on, but my opponent opted to intercept, which was successful. I thought about it and came to the conclusion, that if he wants to burn his 7 dice Schwerpunkt to nullify my 5 dice “Limited Air Support”, then I win in points. Effectively he was spending 175 points to nullify my 115 point expenditure. On my right, I moved as far forward as the concealing wheat would allow, and took couple of shots at a single Pz I, to no effect. On my left, my Pz II platoon advanced and spread out to reduce the effects of his Stukas, but my Leichte Platoon had to bunch up if it was to get around the pond. I should have been patient. Why give your opponent more shots? In addition, I made a noob mistake as that bunching masked the Pz III’s that were on Overwatch on the ridge, negating most of their shots on one of his forward deployed tanks. As it was, the single shot I did get was enough, as the first bonfire lit up in the field.
The defender managed to get his air support in, and caused two of my tanks so bail. The tankers must have locked their keys in their vehicles, because they never unbailed for the rest of the game. He did move some of his tanks to just within range and fired to no effect, while on my right, nothing moved.

Beginning of defenders turn 1.
Turn 2:
Another Air Support roll intercepted. No problem, as my 3 dice was now down to his 4. My right flank took a full ROF against a stationary, but concealed, target causing a triple bail from which his crew abandoned the vehicle. On my left, my Panzer II Platoon halted, and also dumped 15 main gun shots and 5 MG shots into his advanced armor, causing no direct kills but numerous “double bails”. The bunched up Leichte Platoon around the pond advanced and spread out, and with the covering fire of 4 Pz III’s dumped 1 20mm shot, 12 37mm shots and 12 MG shots into the fray also causing no direct hits, but many “double bails.” Several tanks and an armored car were abandoned as a result.
In again came his Stukas, and with the benefit of Schwerpunkt, he got all three, allowing him to reroll misses. But the targets were spread out, and the “ranging in” rolls were poor, and they caused no harm. Of his forces in the field, many of his tanks failed to unbail, and his return fire was much reduced, and also caused no harm. On the right flank, he realized that my Leichte Platoon was not going to tangle with him, and he double-timed his Pz II Platoon from my right to left, while his Leichte Platoon shifted to take up positions behind the town but with firing lanes into the left side of the table.
Turn 3:
Right Flank. Taking advantage of his pull out, I moved my tanks into the open, to just within range of one of his tanks but their firing was ineffective.
Left Flank. The Pz II Platoon, still not moving, placed their full ROF into the single remaining armored car. This was way overkill, but I wanted to make sure that the recon unit was destroyed. My Pz III’s advanced to continue the work on his Leichte Platoon, which, as was the pattern for this game, received no direct kills, but lots of double bails. The Recon unit was destroyed, and the Leichte Platoon failed morale, leaving only the 1IC with a burning wreck of a Pz II for company.
Once again I made a beginner mistake. To spread out, I placed one of my advancing Pz III’s on knoll, a prime target of opportunity for an ambushing unit in the woods. Which of course, Jessie took full advantage of. Only lucky die rolls prevented the destruction of that tank, and half of my best unit was rendered “Combat Ineffective.”
Turn 3, note the “fool on the hill” by the hand, and the 3 Pz III’s in the woods looking at it.

Turn 4:
My Stukas arrived, but failed to hit any targets. With three of defending platoons gone, I only needed one more to force a company morale check. I focused my efforts on his remaining Recon Section hiding behind a building. My two unbailed Pz III’s along with some of parts of my two Leichte Platoons fired, but the main guns muffed their shots, and the MG’s shots, though numerous, (14), none hit anything vulnerable. This was mainly a feint, as my Pz II’s started their engines, and moved to within 4” of the objective. Firing at the 1IC on the way in, causing another double bail which he passed.
The defenders turn saw him race for the objective as well, but was an inch shy, he would get his shots in, but it was up to the Storm Trooper move to keep the game alive for him. His Panzer III’s poured it on the perfectly outlined target on the hill, causing another double bail, which failed the motivation check, but passed on a reroll from my 1IC. His Pz II’s rolled their Storm Trooper roll, and missed. The objective was claimed by the attackers, ending the game for a 6-0 win.

End game, Panzers are about to secure the objective.
Lessons Learned:
Patience is a virtue on the attack. Stay spaced at all times. A few extra shots now do not matter if you lose a tank or two in the process.
Panzer I’s are the pawns. The Leichte Platoon is actually pretty worthless having only two vehicles with any anti-tank capability. When on the attack, lead with the pawns. In the beginning of game is when your opponent is most able to destroy things. Let it be something you don’t value.
Always be cognizant of your opponents ambushes. They will appear at your least convenience. If I am going to play armor, then I will always be facing ambushes.
This game reinforces my opinion that paying extra 10 points to up-armor the Pz II’s from a 1 to a 2 is well spent. We were the same list, but I took the upgrade, and Jessie did not. So my tanks were immune to his MG fire, while his was constantly being harassed by up to 13 extra dice per platoon. And true, they only caused one extra bail every 36 die rolls. But I rolled well over 100 MG dice in the game, and all but one tank of his was eliminated by failing motivation from “double bails.”
This comment has been removed by a blog administrator.
ReplyDeleteThis comment has been removed by the author.
ReplyDelete